HUG MONSTER
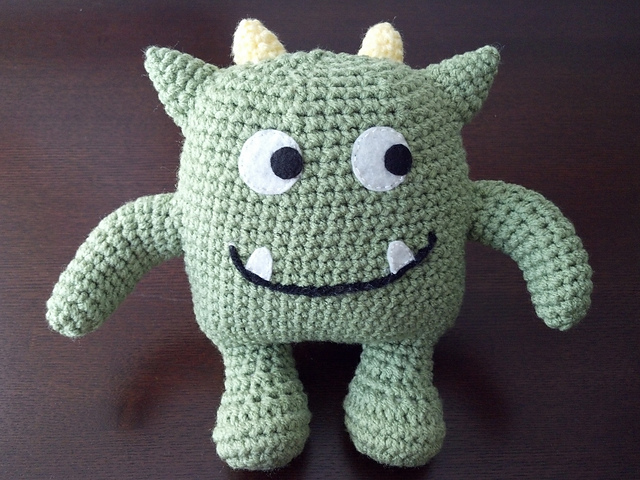
HUG MONSTER
Dimensione finale
8 pollici (20 cm) di altezza
DI distracted design labs
MATERIALI il filato a uso personale, cotone o lana
(il monster in foto e’ stata utilizzata la lana con uncinetto 4,25 mm ma non specifica grandezza della lana)
io personalmente uso quasi sempre cotone n. 5, uncinetto 2,5 mm
colori del filato o lana
rosso per il corpo
giallo pallido per il corno
nero filo da ricamo per la bocca
Feltro bianco e mero
filo bianco e nero
marca punti
ovatta per imbottire
Nota: questo piccolo monster è lavorato all’uncinetto in
continui giri a spirale.
Usa un segnalino punto per tenere traccia dei giri.
PUNTI USATI
maglia bassa
aumento
diminuzione
mezza maglia alta
maglia bassissima
INIZIO LAVORO
BRACCIO SINISTRO usare colore rosso
1 giro anello magico 6 punti bassi (6)
2 giro 1 aumento in ogni punto (12)
3 giro lavorare 12 maglie basse (12)
4 giro lavorare 12 maglie basse (12)
5 giro lavorare 12 maglie basse (12)
6 giro lavorare 12 maglie basse (12)
7 giro 6 mb, 6 mezze maglie alte (12)
8 giro 6 mb, 6 mezze maglie alte (12)
9 giro 6 mb, 6 mezze maglie alte (12)
10 giro 6 mb, 6 mezze maglie alte (12)
11 giro 6 mb, 6 mezze maglie alte (12)
12 giro 6 mb, 6 mezze maglie alte (12)
chiudere con una maglia bassa, poi una maglia bassissima nel punto successiva, lasciare filo lungo per cucire braccio sinistro al corpo
IMBOTTIRE SALDAMENTE
BRACCIO DESTRO usare colore rosso
1 giro anello magico 6 punti bassi (6)
2 giro 1 aumento in ogni punto (12)
3 giro lavorare 12 maglie basse (12)
4 giro lavorare 12 maglie basse (12)
5 giro lavorare 12 maglie basse (12)
6 giro lavorare 12 maglie basse (12)
7 giro 6 mezze maglie alte, 6 maglie basse (12)
8 giro 6 mezze maglie alte, 6 maglie basse (12)
9 giro 6 mezze maglie alte, 6 maglie basse (12)
10 giro 6 mezze maglie alte, 6 maglie basse (12)
11 giro 6 mezze maglie alte, 6 maglie basse (12)
12 giro 6 mezze maglie alte, 6 maglie basse (12)
chiudere con una maglia bassa, poi una maglia bassissima, tagliare filo lasciando coda lunga per cucire braccio destro al corpo
IMBOTTIRE FORTEMENTE
GAMBA DESTRA usare colore rosso
1 giro anello magico 8 punti bassi (8)
2 giro 1 aumento in ogni maglia (16)
3 giro 1 aumento, 1 maglia bassa, ripetere fino alla fine (24)
4 giro lavorare 24 maglie basse (24)
5 giro lavorare 24 maglie basse (24)
6 giro 1 diminuzione x 8 volte, 8 maglie basse (16)
7 giro lavorare 16 maglie basse (16)
8 giro 1 diminuzione x 4 volte, 8 maglie basse (12)
9 giro lavorare 12 maglie basse (12)
10 giro lavorare 12 maglie basse (12)
chiudere con una maglia bassissima, fissare filo e tagliare
IMBOTTIRE PIEDE FORTEMENTE
(nello schema originale la parte finale della gamba terminava con 5 catenelle volanti, che servivano dopo per realizzare il corpo, unendo l’altra gamba con altre 5 catenelle, non ho considerato questa parte nello schema tradotto perche’ cosi e’ piu facile e si ottiene lo stesso risultato in ogni caso alla fine dello schema ho inserito anche lo schema originale)
GAMBA SINISTRA usare colore rosso
1 giro anello magico 8 punti bassi (8)
2 giro 1 aumento in ogni maglia (16)
3 giro 1 aumento, 1 maglia bassa, ripetere fino alla fine (24)
4 giro lavorare 24 maglie basse (24)
5 giro lavorare 24 maglie basse (24)
6 giro 1 diminuzione x 8 volte, 8 maglie basse (16)
7 giro lavorare 16 maglie basse (16)
8 giro 1 diminuzione x 4 volte, 8 maglie basse (12)
9 giro lavorare 12 maglie basse (12)
10 giro lavorare 12 maglie basse (12)
IMBOTTIRE PIEDE FORTEMENTE
continuare unendo le due gambe, assicurati che le gambe siano rivolte allo stesso modo
1 giro continuando dalla gamba sinistra del mostro, lavora 5 catenelle, agganciati alla gamba destra e lavora nella gamba destra 11 mb, 1 aumento, 5 catenelle, unisci l’altra gamba e lavora 11 maglie basse, 1 aumento abbiamo ottenuto 36 maglie (36)
(cosi facendo abbiamo unito le due gambe)
2 giro lavorare 36 mb (36)
3 giro 1 aumento, 5 maglie basse, ripetere fino alla fine (42)
4 giro 1 aumento, 6 maglie basse, ripetere fino alla fine (48)
5 giro lavorare 48 maglie basse (48)
6 giro lavorare 48 maglie basse (48)
7 giro lavorare 48 maglie basse (48)
8 giro lavorare 48 maglie basse (48)
9 giro lavorare 48 maglie basse (48)
10 giro lavorare 48 maglie basse (48)
11 giro lavorare 48 maglie basse (48)
12 giro lavorare 48 maglie basse (48)
13 giro lavorare 48 maglie basse (48)
14 giro lavorare 48 maglie basse (48)
15 giro lavorare 48 maglie basse (48)
16 giro lavorare 48 maglie basse (48)
17 giro 1 diminuzione, 6 maglie basse, ripetere fino alla fine (42)
18 giro lavorare 42 maglie basse (42)
19 giro lavorare 42 maglie basse (42)
20 giro 1 diminuzione, 5 maglie basse, ripetere fino alla fine (36)
21 giro lavorare 36 maglie basse (36)
22 giro 1 diminuzione, 4 maglie basse, ripetere fino alla fine (30)
23 giro 1 diminuzione, 3 maglie basse, ripetere fino alla fine (24)
INIZIARE A RIEMPIRE IL CORPO FORTEMENTE E CONTINUARE A RIEMPIRE MAN MANO CHE SI PROSEGUE
24 giro 6 maglie basse, (1 diminuzione x 3), 6 mb, (1 diminuzione x 3). (18)
25 giro 1 diminuzione, 3 maglie basse, (1 diminuzione x 3), 3 maglie basse, (1 diminuzione x 2). (12)
TERMINARE DI IMBOTTIRE
26 giro 1 diminuzione in ogni maglia (6)
chiudere con una maglia bassissima, fissare filo e tagliare…
ORECCHIE E CODA X 3 colore rosso
1 giro anello magico 4 punti bassi (4)
2 giro 1 aumento, 1 maglia bassa, ripetere (6)
3 giro 1 aumento, 2 maglie basse, ripetere (8)
4 giro 1 aumento, 3 maglie basse, ripetere (10)
IMBOTTIRE FORTEMENTE
chiudere con una maglia bassissima, fissare filo e lasciare coda lunga per cucire orecchie e coda al corpo…
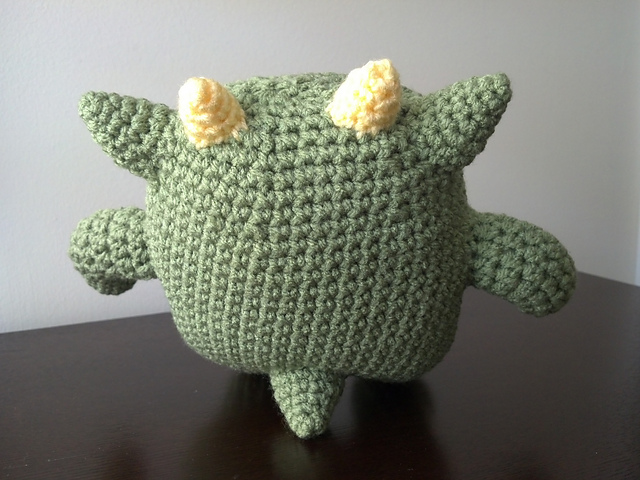
CORNA X 2 colore giallo
1 giro anello magico 4 punti bassi (4)
2 giro 1 aumento, 1 maglia bassa, ripetere (6)
3 giro 1 aumento, 2 maglie basse, ripetere (8)
IMBOTTIRE FORTEMENTE
chiudere con una maglia bassissima, fissare filo e lasciare coda lunga per cucire corna alla testa…
montaggio
Assicurati che le orecchie siano imbottite e attaccate alla parte superiore della testa.
Assicurarsi che le corna siano imbottite saldamente e attaccate alla sommità della testa tra le orecchie.
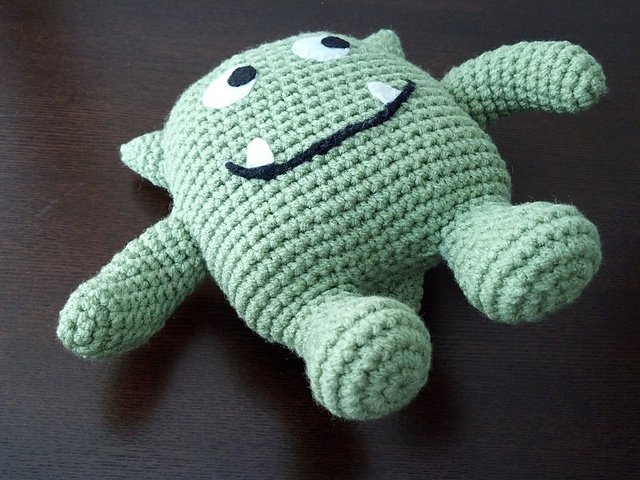
Attacca le braccia al corpo con la parte superiore delle braccia in corrispondenza della riga 13 del corpo.
Viso
Ricama la bocca con una catenella sul davanti usando un filo nero. Taglia 1 “feltro bianco
cerchi per gli occhi e ½ “cerchi in feltro nero per le pupille. Cucire pupille sugli occhi con il nero e poi cuci gli occhi sul viso del mostro con filo bianco. Completare bocca cucendo su due piccoli triangoli di feltro bianchi per i denti.
SCHEMA ORIGINALE
Materials List
Red Heart With Love Solids, in Lettuce #1601, or
equivalent, for body
Red Heart Super Saver, in Pale Yellow #0322, or equivalent,
in horn color of choice
Red Heart Super Saver, in black #0312, or equivalent, for
mouth
Size G/6 4.25mm crochet hook
Tapestry or darning needle
White and black craft felt
White and black thread
Stitch marker (or a piece of yarn to mark the ends of
rounds)
Fiberfill for stuffing
Special Stitch
Sc2tog = Single Crochet Decrease. To make this stitch
almost invisible insert crochet
hook into front loop of next stitch, yarn over, then pull
through. Keep the loop on the
hook, then insert hook into front loop of next stitch, yarn
over and pull through. There
should be 3 loops on the hook. Yarn over and pull through
all three loops.
Hug Monster’s Left Arm
1. Work 6 sc into magic ring.
2. Work 2 sc in each sc around. (12 st)
3. Sc in each sc around.
4. Sc in each sc around.
5. Sc in each sc around.
6. Sc in each sc around.
7. Sc in 6 sc, hdc in each of next 6 sc. (12 st)
8. Sc in 6 sc, hdc in each of next 6 hdc. (12 st)
9. Sc in 6 sc, hdc in each of next 6 hdc. (12 st)
10. Sc in 6 sc, hdc in each of next 6 hdc. (12 st)
11. Sc in 6 sc, hdc in each of next 6 hdc. (12 st)
12. Sc in 6 sc, hdc in each of next 6 hdc. (12 st)
Sc in next stitch, then sl st to fasten off and end with
long tail. Stuff firmly, maintaining
bend in arm.
Hug Monster’s Right Arm
1. Work 6 sc into magic ring.
2. Work 2 sc in each sc around. (12 st)
3. Sc in each sc around.
4. Sc in each sc around.
5. Sc in each sc around.
6. Sc in each sc around.
7. Hdc in 6 sc, sc in each of next 6 sc. (12 st)
8. Hdc in 6 hdc, sc in each of next 6 sc. (12 st)
9. Hdc in 6 hdc, sc in each of next 6 sc. (12 st)
10. Hdc in 6 hdc, sc in each of next 6 sc. (12 st)
11. Hdc in 6 hdc, sc in each of next 6 sc. (12 st)
12. Hdc in 6 hdc, sc in each of next 6 sc. (12 st)
Sc in next stitch, then sl st to fasten off and end with
long tail. Stuff firmly, maintaining
bend in arm.
Hug Monster’s Right Leg
1. Work 8 sc into magic ring.
2. Work 2 sc in each sc around (16 st)
3. *2sc in next sc, sc in next sc; repeat from * around.
(24 st)
4. Sc in each sc around.
5. Sc in each sc around.
6. Sc2tog 8 times, sc in each of next 8 sc to finish round.
(16 st)
7. Sc in each sc around.
8. Sc2tog 4 times, sc in each of next 8 sc to finish
round.(12 st)
9. Sc in each sc around.
10. Sc in each sc around, ch5 tightly for crotch.
Stuff foot firmly. Stuff leg lightly.
Fasten off and end with short tail.
Hug Monster’s Left Leg
1. Work 8 sc into magic ring.
2. Work 2 sc in each sc around (16 st)
3. *2sc in next sc, sc in next sc; repeat from * around.
(24 st)
4. Sc in each sc around.
5. Sc in each sc around.
6. Sc in 8 sc, sc2tog 8 times to finish round. (16 st)
7. Sc in each sc around.
8. Sc in 8 sc, sc2tog 4 times to finish round.(12 st)
9. Sc in each sc around.
10. Sc in each sc around.
Sc in next 2st (or as many as needed) to reach crotch side
of left leg. (2st)
Do not finish off or cut yarn.
Stuff foot firmly. Stuff leg lightly.
Joining Legs/ Making Body
Note: Make sure legs both face the same way.
1. Continuing from the monster’s left leg, sc in each of
the back loops of the 5 chain
stitches from the right leg. 5sc in front 5 sc of right
leg, 2sc in next sc, 6sc in last sc of
right leg. Work sc into each of the remaining loops of the
5 chain stitches. 5sc in back
5 sc of left leg, 2sc in next sc, 6sc to finish round.
(36st)
2. *2sc in next sc, sc in next 5sc; repeat from * around.
(42st)
3. *2sc in next sc, sc in next 6sc; repeat from * around.
(48st)
4. Sc in each sc around.
5. Sc in each sc around.
6. Sc in each sc around.
7. Sc in each sc around.
8. Sc in each sc around.
9. Sc in each sc around.
10. Sc in each sc around.
11. Sc in each sc around.
13. Sc in each sc around.
14. Sc in each sc around.
15. Sc in each sc around.
16. Sc in each sc around.
17. *sc2tog, sc in each of next 6 sc; repeat from * around.
(42st)
18. Sc in each sc around.
19. Sc in each sc around.
20. *sc2tog, sc in each of next 5 sc; repeat from * around.
(36st)
21. Sc in each sc around.
22. *sc2tog, sc in each of next 4 sc; repeat from * around.
(30st)
23. *sc2tog, sc in each of next 4 sc; repeat from * around.
(24st)
Stuff body firmly and continue to stuff as more rows are
completed.
24. *sc6, (sc2tog x3), sc6, (sc2tog x3). (18st)
25. *sc2tog, sc3, (sc2tog x3), sc3, (sc2tog x2). (12st)
26. *sc2tog around; repeat from * until closed.
Fasten off and weave in end.
Ears and Tail (Make 3)
1. Work 4 sc into magic ring.
2. *2sc in next sc, sc in next sc; repeat from * around. (6
st)
3. *2sc in next sc, sc in next 2sc; repeat from * around.
(8 st)
4. *2sc in next sc, sc in next 3sc; repeat from * around.
(10 st)
Fasten off and end with a long tail.
Stuff firmly.
Horns (Make 2)
1. With contrasting color, work 4 sc into magic ring.
2. *2sc in next sc, sc in next sc; repeat from * around. (6
st)
3. *2sc in next sc, sc in next 2sc; repeat from * around.
(8 st)
Fasten off and end with a long tail.
Stuff firmly.
Assembly
Ensure Ears are stuffed firmly and attach to outside top of
head.
Ensure horns are stuffed firmly and attach to top of head
between ears.
Attach arms to body with the top of the arms at
approximately row 13 of body.
Weave in all loose yarn ends.
Face
Embroider mouth with a chain stitch across front using
black yarn. Cut 1” white felt
circles for eyes and ½” black felt circles for pupils.
Stitch pupils onto eyes with black
thread and then stitch eyes in place on the monster’s face
with white thread. Complete
mouth by stitching on two small white felt triangles for
teeth.