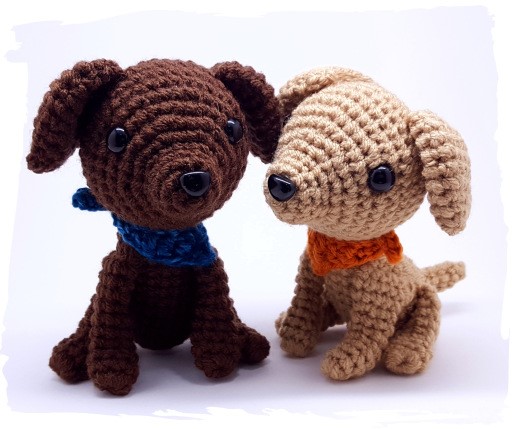
PICCOLO CANE (Dog Pattern)
Schema di Maya Does Crochet Filati usati: Hobby Lobby’s I Love This Yarn (ma puoi usare i filati ed i colori che desideri) uncinetto 2,5 mm ovatta di riempimento segna punti naso da cane (non viene specificata la misura) occhi di sicurezza (non viene specificato la misura)
Abbreviazioni mbss: maglia bassissima mb: maglia bassa aum: aumento dim: diminuzione
Testa RND 1: 6 mb in anello magico (6) RND 2: 6 aum (12) RND 3-4: lavorare 12 mb (12) Inserire il naso nella parte superiore del secondo giro RND 5: [2 mb, 1 aum] x4 (16) RND 6: [1 mb, 1 aum] x8 (24) RND 7: [2 mb, 1 aum] x8 (32) RND 8: lavorare 32 mb (32) RND 9: [3 mb, 1 aum] x8 (40) RND 10-13: lavorare 40 mb (40) Posizionare gli occhi tra i giri 8 e 9 e circa 9 punti di distanza l’uno dall’altro. RND 14: [3 mb, 1 dim] x8 (32) RND 15: lavorare 32 mb (32) RND 16: [2 mb, 1 dim] x8 (24) RND 16 [1 mb, 1 dim] x8 (16) Riempire bene la testa RND 17: 8 diminuzioni (8) Chiudere con 1 mbss, fissare filo e tagliare. Orecchie x2 RND 1: 4 mb in anello magico (4) RND 2: 4 aum (8) RND 3: [1 mb, 1 aum] x4 (12) RND 4: [2 mb, 1 aum] x4 (16) RND 5: lavorare 16 mb (16) RND 6: [3 mb, 1 aum] x4 (20) RND 7-8: lavorare 20 mb (20) RND 9: [3 mb, 1 dim] x4 (16) Chiudere con 1 mbss, lasciare una lunghezza di filo da attaccare alla testa. Iniziare la cucitura dal giro 9 della testa e inclinarsi verso il basso verso l’alto dell’orecchio e cucire attraverso la maglia. Corpo RND 1: 6 mb in anello magico (6) RND 2: 6 aum (12) RND 3: [1 mb, 1 aum] x6 (18) RND 4: [2 mb, 1 aum] x6 (24) RND 5-7: lavorare 24 mb (24) RND 8: 1 dim, 20 mb, 1 dim (22) RND 9: lavorare 22 mb (22) Rnd 10: 1 dim, 18 mb, 1 dim (20) RND 11: lavorare 20 mb (20) RND 12: 1 dim, 16 mb, 1 dim (18) RND 13: lavorare 18 mb (18) RND 14: 1 dim, 14 mb, 1 dim (16) RND 15: 1 dim, 12 mb, 1 dim (14) Chiudere con 1 mbss, fissare filo, riempire, cucire corpo alla testa. Il corpo può essere cucito in qualsiasi modo, tutto dipende da come si vuole che la testa orientata, ma assicuratevi di metterlo indietro un paio di giri altrimenti si potrebbero avere problemi di equilibrio. Gambe anteriori x2 RND 1: 8 mb in anello magico (8) RND 2-7: lavorare 8 mb (8) RND 8: [3 mb, 1 aum] x2 (10) RND 9: lavorare 10 mb (10) RND 10: [4 mb, 1 aum] x2 (12) Riempire gambe Appiattire l’estremità della “zampa” in un senso, quindi appiattire la “gamba” nel senso opposto. Io non imbalsamare le gambe solo piegare e modellare loro. Lasciare una lunghezza di filo per attaccare al corpo, iniziare intorno al giro 12 del corpo e angolare la gamba dove toccherà il terreno quando il cane è in una posizione seduta (di solito cucito su un arco di cinque giri). Gambe posteriori x2 RND 1: 8 mb in anello magico (8) RND 2-5: lavorare 8 mb (8) RND 6: [3 mb, 1 aum] x2 (10) RND 7: lavorare 10 mb (10) RND 8: [4 mb, 1 aum] x2 (12) RND 9: [5 mb, 1 aum] x2 (14) Riempire gambe Piegare e modellare come le gambe anteriori. Lasciare una lunghezza di filato per attaccarsi al corpo. Iniziare intorno al giro 7 del corpo, angolare la gamba in modo che si sieda a terra in posizione seduta, cucita su una campata da quattro a cinque giri. Coda RND 1: 3 mb in anello magico (3) RND 2: 3 aum (6) RND 3-7: lavorare 6 mb (6) Chiudere. Lasciare una lunghezza di filato per attaccarsi al corpo. Iniziando intorno al giro 7 del corpo e al centro della schiena. Bandana ROW 1: avviare 31 catenelle ROW 2: 10 mbss, 2 mb, 2 ma, 2 ma, 1 maglia altissima, 3 catenelle e 1 mb nella terza catenella, 1 maglia altissima, 2 ma, 2 mb, 10 mbss. Intrecciare le estremità e legare intorno al collo dei cani
schema originale
These littles one don’t take that long to whip up and aside from all the sewing together (My least favorite part), they are easy to make. The dog pattern is very similar to my Curious Fox Pattern in that they are the same shape and size. Hook: 2.25 mm Yarn used: Hobby Lobby’s I Love This Yarn Abbreviations: MC = Magic Circle CC = Yarn color change (Counts as first st of the rnd) Sl St = slip stitch CH = chain Sc rnd = sc in every stitch around INC = Increase, 2 sc in same st DEC = Decrease, next 2 sts crocheted together Materials: 10 mm safety eyes 10 mm safety nose Pattern: Head RND 1: Mc 6 sc (6 sts) RND 2: 6 inc (12sts) RND 3-4: Two sc rnds (12 sts) Insert nose at the top of RND 2 RND 5: [2sc, inc] x4 (16 sts) RND 6: [sc, inc] x8 (24 sts) RND 7: [2sc, inc] x8 (32 sts) RND 8: sc rnd (32 sts) RND 9: [3sc, inc] x8 (40 sts) RND 10-13: Four sc rnds (40 sts) Place eyes between RND 8 and 9 and about 9 sts/sc apart RND 14: [3sc, dec] x8 (32 sts) RND 15: sc rnd (32 sts) RND 16: [2sc, dec] x8 (24 sts) RND 16 [sc, dec] x8 (16 sts) RND 17: 8 dec (8 sts) Stuff and Close Ears x2 RND 1: Mc 4 sc (4 sts) RND 2: 4 inc (8 sts) RND 3: [sc, inc] x4 (12 sts) RND 4: [2sc, inc] x4 (16 sts) RND 5: sc rnd (16 sts) RND 6: [3sc, inc] x4 (20 sts) RND 7-8: Two sc rnds (20 sts) RND 9: [3sc, dec] x4 (16 sts) Sl st opening closed, leave a length of yarn for attaching to head. Start at RND 9 of the head and angle to top of ear downward and sew on through the sl st’s. Body RND 1: Mc 6 sc (6 sts) RND 2: 6 inc (12 sts) RND 3: [sc, inc] x6 (18 sts) RND 4: [2sc, inc] x6 (24 sts) RND 5-7: Three sc rnds (24 sts) RND 8: dec, 20 sc, dec (22 sts) RND 9: sc rnd (22 sts) Rnd 10: dec, 18 sc, dec (20 sts) RND 11: sc rnd (20 sts) RND 12: dec, 16 sc, dec (18 sts) RND 13: sc rnd (18 sts) RND 14: dec, 14 sc, dec (16 sts) RND 15: dec, 12 sc, dec (14 sts) Leave a length of yarn for attaching to head. Stuff. The body can be sewn on any which way, it all depends on how you want the head oriented, but be sure to place it back a few rnds else you might have balance issues. Front legs x2 RND 1: Mc 8 sc (8 sts) RND 2-7: Six sc rnds (8 sts) RND 8: [3sc, inc] x2 (10 sts) RND 9: sc rnd (10 sts) RND 10: [4sc, inc] x2 (12 sts) Flatten the ‘paw’ end one way then flatten the ‘leg’ the opposite way. I don’t stuff the legs only bend and shape them. Leave a length of yarn for attaching to body, start around RND 12 of the body and angle the leg where it will touch the ground when the dog is in a sitting positions (usually sewn across a span of five rnds). Back legs x2 RND 1: Mc 8 sc (8 sts) RND 2-5: Four sc rnds (8 sts) RND 6: [3sc, inc] x2 (10 sts) RND 7: sc rnd (10 sts) RND 8: [4sc, inc] x2 (12 sts) RND 9: [5 sc, inc] x2 (14 sts) Bend and shape the same as the front legs. Leave a length of yarn for attaching to the body. Start around RND 7 of the body, angle leg so that it will sit along the ground while in a sitting position, sewn on across a span of four to five rnds. Tail RND 1: Mc 3 sc (3 sts) RND 2: 3 inc (6 sts) RND 3-7: Seven sc rnds (6 sts) Leave a length of yarn for attaching to body. Starting around RND 7 of the body and at the center of it’s back. Bandana ROW 1: Ch 30+1, turn ROW 2: 10 sl st, 2 sc, 2 dc, tr, ch 3 and sc in third ch from hook, tr, 2 dc, 2 sc, 10 st sl Weave in ends and tie around the dogs neck.