SCHEMA IN INGLESE
CANE TERRIER
Scottish terrier
Here
Scottish terrier
Skotsk terrier.pdf
![]() Swedish
Swedish
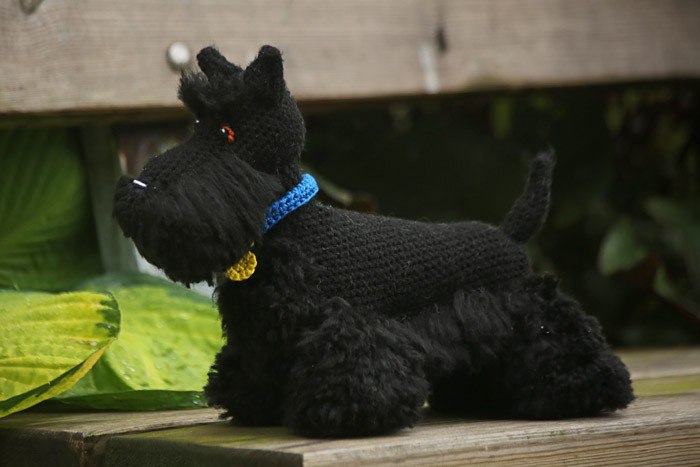
Here I will share with you how I made my Scottish terrier, Buster.
Buster is roughly 30 cm long and 25 cm tall, but the final size is dependant on factors
such as the thickness of the yarn and what size hook you’ve used, so it might vary
somewhat.
I will say right off the bat that English isn’t my first language, so apologies for any
mistakes or weird phrasings…
I’m going to assume that you are familiar with basic (US) terms and how to make a
magic circle. If you don’t, try for instance YouTube, where you can find many useful
tutorials.
Required materials
• Yarn. I used ca 140 g of acrylic yarn. You can use something else if you prefer,
just remember that cotton yarn doesn’t work as it can’t be brushed out. Just
about any acrylic or wool (or a mix with either of these) should work. It’s a
bonus if the yarn is soft and splits ends easily. The tighter it is spun, the harder
you will work at later stages.
• Crochet hook. I used a size 3.5 mm. If needed, change size to suit your yarn of
choice. You shouldn’t see gaps in your work.
• A suitable needle for sewing the parts together.
• Filling. I buy cheap pillows aty IKEA and other stores and use their filling.
• Safety nose and eyes, unless you want to embroider those details.
• A slicker brush. You can find one in a pet store if needed – get a heavy duty
dog one, not a measly rabbit brush.
• Patience. And lots of it.
The process
You can divide the making of Buster into four main parts. First off you will crochet all
body parts and assemble them. Next is to attach the fur, which in my opinion is the
most boring part. Last the fur will be brushed, clipped and styled. After that you’re
done!
Part 1: The body parts
Let’s get started! Time to crochet, and how. All parts are done in a continous spiral.
Make the following body parts:
Head
Row 1: Make a magic circle of 6 sc
Row 2: Inc in every sc around (12)
Row 3: [1 sc, 1 inc] around (18)
Row 4: [2 sc, 1 inc] around (24)
Row 5 – 14: sc around (24)
Row 15: [1 Inc] 6 times in a row (so first 6 sc = 12 sc), then 1 sc around (30)
Row 16: sc around (30)
Row 17: [1 inc] 6 times in a row, 1 sc around (36)
Row 18 – 25: sc around (36)
Row 26: [4 sc, Dec in next] around (30)
Row 27: [3 sc, Dec in next] around (24)
Row 28: [2 sc, Dec in next] around (18)
Now might be a good time to start adding the filling… and attach the eyes and nose,
if you’re using safety ones!
Row 29: [1 sc, Dec in next] around (12)
Row 30: Dec around, sew together the opening (after adding the last of the filling).
Leave a long tail.
The head should resemble an elongated thingie with a clear forehead (called a stop in
dog circles), marked as ”upp” here. Not unlike a misshapen baguette.
Ears (make 2)
Row 1: Make a magic circle of 4 sc (4)
Row 2: 1 sc, then Inc, repeat once (6)
Row 3: 2 sc, then Inc, repeat once (8)
Row 4: 3 sc, then Inc, repeat once (10)
Row 5: 4 sc, then Inc, repeat once (12)
Row 6: 5 sc, then Inc, repeat once (14)
Row 7: sc around (14)
Finish off, leaving long tail. Do not add filling.
The ears should be triangular, a bit elongated and flat.
Body
Row 1: Make a magic circle of 6 sc
Row 2: Inc in every sc around (12)
Row 3: [1 sc, 1 inc] around (18)
Row 4: [2 sc, 1 inc] around (24)
Row 5: [3 sc, 1 inc] around (30)
Row 6: [4 sc, 1 inc] around (36)
Row 7: [5 sc, 1 inc] around (42)
Row 8: [6 sc, 1 inc] around (48)
Row 9-15:sc around (48)
Row 16: Now we are going to Dec 1 by each row, always when starting a new row,
followed by sc around the rest. So row 16 will end with 47 sc, row 17 ends with 46 sc
etc. Continue doing this until…
Row 30: Dec 1, sc around (32)
Row 31: Stop decreasing! Sc around (32)
Row 32-46: sc around (32)
Row 47: 15 sc, Dec – repeat once (30)
Row 48: [3 sc, Dec] around (24)
Row 49: [2 sc, Dec] around (18)
Now might be a good time to add the filling.
Row 50: [1 sc, Dec] around (12)
Row 51: Dec around, add last of filling and sew together. Sew in tail.
You should now have an elongated shape with a clear ribcage. The thick end goes
towards the head (labelled ”huvud”) and the thin is the butt. The plane side is the
back and the angled is the underside.
Neck
Row 1: Chain 18, close with a sl st. Try to save a long tail (ie. start further down on
the yarn than you would otherwise).
Row 2-10: Inc 1 at start of every row, then sc around. So row 2 has 19 sc, row 3 has
20 etc. Do this until row 10 when you should have 27 sc. Finish off, saving long tail.
You should now have an elongated, slightly triangular tube. The thinner part goes to
the head (”upp”). The ”point” goes down towards the front of the chest (not the back
– ”rygg”).
Legs (make 4)
Row 1: Make a magic circle of 6 sc
Row 2: Inc in every sc around (12)
Row 3: [1 sc, 1 inc] around (18)
Row 4-19: sc around (18)
Add filling but save a bit of room at the top of each leg. Flatten and sew the opening
together. Leave a long tail.
Tail
Row 1: Make a magic circle of 4 sc (4)
Row 2: 1 sc, then Inc, repeat once (6)
Row 3: 2 sc, then Inc, repeat once (8)
Row 4: 3 sc, then Inc, repeat once (10)
Row 5: sc around (10)
Row 6: 4 sc, then Inc, repeat once (12)
Row 7-10: sc around (12)
tail.
Part 2: Assembly
Time to sew all the parts together!
For the neck – start with attaching the larger end to the body. Add filling. Now fold the
top end of the neck portion in a bit, so you will actually sew into the 2nd or 3rd row
rather than the first. This gives a bit of extra stability. Try to make the head–neck–
body transition as seamless as you can, it’s a bit tricky. Stop and check now and then
how it’s coming along.
The hind legs are angled back while the frontlegs are straight under the body.
Remember to put the frontlegs fairly far forward, a scotty shouldn’t have a lot of
forechest.
Make sure to attach all parts well! You will work hard when brushing out the fur and
it’s not fun if the parts start to fall off.
If you are going to embroider the nose and eyes, now is a good time. When I made
my Scotty I did this as the very last step and it was a total mess, the newly brushed
and trimmed fur did everything in its power to be in the way as I was working the
needle.
It should look something like this…
(translation: Spets = point, Smal = thin, Raka = Straight, Vinklade = angled)
Part 3: Attaching fur
Now it’s time to cut approx. 5 billion strands of yarn, each ca 7-10 cm long. I usually
fold the yarn so I can cut several strands at once – saving me time – and then attach
them before cutting new ones. Gives you a little bit of variation at least.
When attaching the strands, pull your crochet hook under a chosen stitch on your dog.
Now fold the strand into an U-shaped loop. Then use the crochet hook to pull the loop
under the stitch before pulling the yarn ends through the loop, securing it to the
stitch. It sounds a lot more complicated than it is!
Add a strand to every (or just about every. Most of them, at any rate) stitch on the
sides and undersides of the muzzle, as eyebrows, on the front side of the chest, on
the legs except the undersides and the underside of the body. Yes, it takes forever.
Put on a good movie (or five).
Part 4: Brushing and trimming
Go get your (potentially new and shiny) slicker brush and now brush all the attached
strands until they become beautifully fluffy and fur-like. Don’t be afraid to use hard
strokes, depending on your yarn it might take a while. The brush will collect some fluff
that you need to remove now and then, it can be saved as ultra soft filling if you wish.
(Don’t forget to protect the eyes and nose while using the brush close to them. The
brush can damage the plastic or your beautiful embroidened details)
The ”smooth” parts aren’t intended to be brushed. But feel free to do so if you want a
more ”ragged” look.
When you have brushed all the fur it’s time for the most fun part – time to play dog
groomer!
I recommend to start by googling some photos of Scottish terriers, to get an idea of
what it should look like. But in short form the beard so it has a nice gradual look
towards the skull, fix up the eyebrows a bit. Remove quite a bit from the frontchest, it
should have an almost straight line from the throat and down to the ground. Even the
legs out all around (don’t forget to check what they look like from below) but try to
leave the body fur long, just even it out. Keep alternating between brushing and
trimming until you’re satisfied.
Now your doggie is aaalmost done. But he deserves a collar, don’t you think? Thought
so.
I made mine using a cotton blend, to make it appear different from the coat. Pick a
suitable clour and do a chain of around 35 (double check to see if this fits your dog,
since it might be a different size from mine). Chain 2 extra, turn. Now hdc to the end.
Repeat once more (chain 2, turn, hdc to the end) or until you’re satisfied with the
width. Don’t forget to save a long tail.
Now take the colour for the ”ID-badge”. Do a magic circle of 6, then Inc around (12).
Finish with a sl st. Now chain 12 and then a sl st back into the badge, so you have a
nice little loop attachment.
Thread the collar through the loop, then put on the dog and sew the ends together.
NOW you are done! Congrats, you have made your very own Scotty!